In a previous article, we reviewed how optimized well usage can be thought of a balance between sufficient drawdown while minimizing over pumping. Adding a cistern can be a great way to achieve this balance by both protecting your well and maximizing water production.
Unfortunately, too often these benefits are lost with improper fill configurations. This article goes over the various settings and offers a process to optimize your cistern setup.
Cistern Basics
A cistern is simply a water storage tank that acts as a buffer between the well and your house. It often has a separate pump to re-pressurize the home plumbing with a fill inlet from the well. While numerous configurations could exist, we’ll go over the most common settings available:
- Float Switch: this could be either one or two floats and will control the level at which the cistern calls for water and when the cistern is full.
- Timer: a configurable timer can be added to give more control over the pump and rest time.
- Pump Fault Controller (e.g. PumpSaver): wells typically experience high drawdowns during a fill cycle so fault controllers offer added protection from dry running, jammed impellor, and a number of other fault conditions.
All these items should be properly configured to optimize your system.
Determine Your Goals
In general, a cistern can help protect both the pump and the well. These can be competing concepts so you need to decide what is more important in your situation. In this article, we’ll review a process that prioritizes production and longevity while secondarily minimizing pump cycling. A case study will be referenced in each step to demonstrate the potential improvements.
Step 1: Characterize Your System
You must first understand how your system performs in order to optimize it. Conveniently, the imbrr dashboard contains a readout of all relevant statistics. Allow your well to rest for an extended time and observe several pump cycles. The well pump can be manually engaged using the pump shutoff switch, or you can observe the current fill settings. Try varying pump amounts and rest periods to see how the well performs. Take note of:
- Recovery
- Pump Rate
- Static Level
- Well Storage
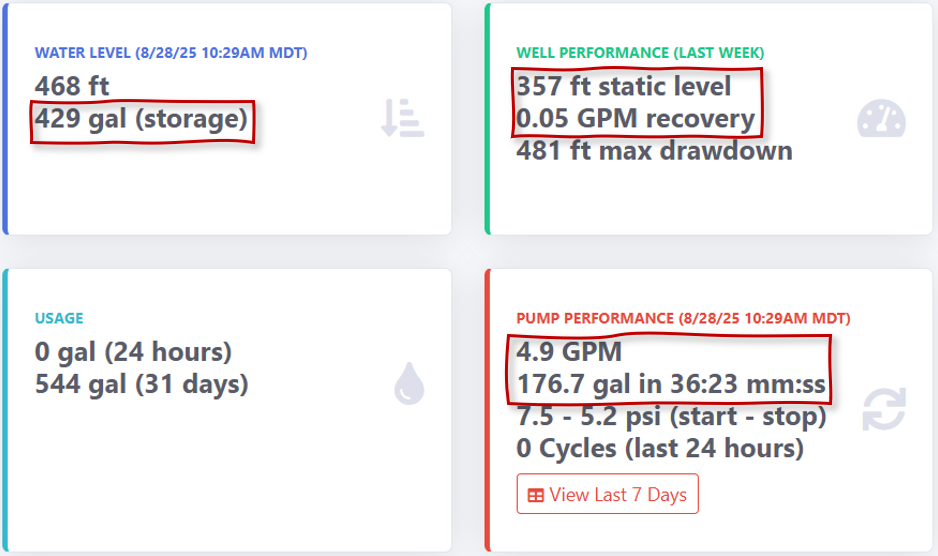
After initial fill cycles, the dashboard of our case study shows a recovery of about 3 GPH and a 4.9 GPM pump rate. The static level is 357 ft deep with over 400 gallons of water stored in the well.
Step 2: Set Initial Fill Amount
The initial fill amount is a balance among practical limits. This value will be fine tuned in later steps so no need to get it perfect. The limits to consider:
- Well Storage: keep the fill amount less than the storage in the well to avoid running it dry.
- Minimum Run Time: many pump manufacturers recommend a minimum run time to reduce the cycling. If you can’t find it, at least 3 to 5 minutes is a good minimum.
- Cistern Size: leaving sufficient reserve is necessary for low yield wells to avoid running out of water with high demand.
- Float Hysteresis: if using a single float, the minimum fill amount will be dependent on the tether and the circumference of the cistern.
For low yield applications, a good starting point is a shorter tether that exceeds the minimum run time and stays below the storage in the well. In our example, this resulted in a fill amount of approximately 177 gallons which takes 36:23 mm:ss to fill (see dashboard above).
Step 3: Observe the Peak Level
Allow the pump to run 3-5 fill cycles. Observe the peak level in each run. Does it rise, fall, or remain constant? In our example, the peak level rises and then remains constant.

Step 4: Adjust Float Tether and/or Timer
For maximum production, the objective is to achieve a continuous slow harvest of water where the water pumped approximately equals the natural recovery of the well. This minimizes time at the static level but also doesn’t over pump the well. You can attempt to achieve this both with float and timer adjustments:
Float
From Step 3, observe time at the static level. If the well is resting for extended periods, consider shortening the float tether to reduce the drawdown and increase the time the well is producing water. If the levels are declining, consider extending the tether to smooth demand and allow more recovery time. If the levels are rising, wait more cycles for the level to stabilize.
Timer
A timer will give precise control as the OFF time is not dependent on the water usage. Review the recovery, pump rate, average usage, and static level from step 1. Set the timer to run a set amount that matches the recovery, stays below the static level, and satisfies the average usage.
With any float or timer adjustments, repeat Steps 1-3 to see well performance changes, check that the fill limits are not violated, and monitor changing peak levels. Ideally, you can find a setting with constant peak levels that doesn’t spend unnecessary time at the static level.
In our case study, the levels were initially rising so they were allowed to stabilize. Afterwards, it was noted the well was spending excessive amounts of time at the static level with a high drawdown. To address, the float was shortened which reduced the fill amount from 180 gallons to 50 gallons. A timer could have also accomplished the same thing by setting the fill time to approximately 10 minutes and the rest time equal to the recovery of the well (about 12 hours to recover 50 gallons). This change caused the peak levels to stabilize below the original static level (increasing the recovery) while simultaneously reducing the max drawdown (improving longevity).

Step 5: Adjust Fault Protection
It’s good practice to have fault protection on your pump to protect it from dry running. Again, too often the fault protection settings are not optimized to the well, especially the fault restart delay.
In our example, the dry run rest time was initially set at 5min. The well only recovered about a third of a gallon in this time which resulted in almost 300 cycles per day when dry run occurred. This will significantly reduce the lifespan of the well pump.
Using the timer guidelines above, 12 hours would be an ideal rest time to allow the well to recover 50 gallons. However, the max setting was 3.75 hours so that’s what was used, and an alert was set in the imbrr dashboard to notify the owner of a dry run condition.
Step 6: Make Seasonal Adjustments
The usage and recovery likely will change throughout the year. Monitor how the system performs and make adjustments as needed following the above process.
Conclusion:
This is a very low yield well; however, this process increased the recovery from 3 GPH to 4 GPH (a 33% increase!) while simultaneously reducing the max drawdown 54 ft (a 13% reduction!). For this well owner, it was the difference between consistently running the well dry and having sufficient water to meet their demand. They also determined the yield increases to 0.5 GPM during spring allowing them to harvest more water, perform water intensive tasks (like cleaning the cistern), and create additional buffer.
Ready to optimize your setup? Have feedback on this article or want to discuss your individual results? Please reach out to us at support@imbrr.com. Our Well Monitoring System makes it easy, and we are happy to provide additional suggestions to solve your unique problem statements.